Element Games - discounts on miniatures and hobby supplies!

Element Games - Wargaming Webstore
Showing posts with label Miniature Painting. Show all posts

Tuesday, 31 January 2023

Heresy Miniatures monsters - WIP pics

I took some new photos of my Mucklegeet the Giant from Heresy Miniatures (I dubbed him Magbragog Maneater to lead my Stomper Tribe of Sons of Behemat in Age of Sigmar) and as I was writing about it I was thinking about all the bits and pieces from Heresy Miniatures that I've painted up. I think Andy makes some great stuff - this is a selection of things from him that I've painted. Some of them need some better photos taken, and I have a bunch more that aren't finished yet, but this is a nice little selection. You should check his site out if you are after some fun and interesting fantasy or sci-fi models, good quality and well worth it! 

Heresy Miniatures: , The best miniatures that you never heard of!

Sons of Behemat - growing Stomper Tribe

The Tribe so far

So far I've got about 1,200 points of Sons of Behemat fully painted up for Age of Sigmar, with a load more in progress. I really like the concept of an army of giants led by even bigger giants - they look great on the tabletop and are fun to play. 

Magbragog's Stomper Tribe

Warstomper Mega Gargant - Magbragog Maneater

Mancrusher Gargant Mob - The Stompy Brothers (Fat Glurg, Dronk Stunty-Stomper and Grumbog Aleguzzler)

Mancrusher Gargant Mob - Wanderers of Albion (Bruinen the Wise and Bologs One-eye. Cachtorr still needs some painting!)


Magbragog is my Warstomper leader. I love this giant model - you can get it from Heresy Miniatures here. While you're there, Andy has a load of other really cool fantasy miniatures too. I have more of his stuff painted up, but also a load of demons and other monsters from a kickstarter he did years ago that are desperately in need of me getting them finished. I've even got one of his epic dragons, which really needs painting! Anyway, there are some 'lovely' ghouls (that he has now redone in plastic), which starred in Session 15 of my D&D campaign, as well as a version of Big Boris, his signature model I suppose, and some gribblies here. I didn't initially buy the giant during the kickstarter as I didn't quite get what he was doing with it, but once it was finished I loved it. And, timing wise, it was perfect as it was just as Games Workshop were talking about doing an army of giants!

The model has so much character, and I had the new TerrainCrate stuff from Mantic so decided to make a scenic base to show that the paladin being eaten might have been in the middle of his campfire dinner when Magbragog scooped him up as a snack. I love having details like this that tell a story with a model, and when it comes to giants it's really nice to have something that indicates their sheer size - he clearly isn't an upscaled man, he's a huge and terrifying colossus! As I was assembling him before the official Mega Gargant model came out, I ended up using a non-standard base for him, but the tent and eveything fit much better on this oval base anyway. I think with bases this large it isn't going to make much of a difference in a game, but I have mounted all my other Mega Gargants on the 'proper' bases. Rule of cool wins out over tournament pickiness anyway!  


Magbragog Maneater, Warstomper Mega Gargant

When I was a young 'un, I always wanted the Giants of Albion - I thought they were great, but my pocket money never quite stretched to it! I got them more recently off Ebay. Cachtorr is still being painted, but I completed Bologs. He had a broken let so I repositioned it on a rock so you can really see him leaning back, ready to throw his menhir - I like being able to see him a bit easier from above when playing. Dronk Stunty-Stomper is one of the old Orc and Goblin giants that I had in a bits box for a long time, finally finding his home in Magbragog's tribe!   

The Mancrushers Bologs One-eye and Dronk Stunty-Stomper

Talking about old models, Grumbog Aleguzzler is the classic old Marauder giant. Again, I coveted this model as an even younger young 'un! So full of character, I had to find one to include. As he has a barrel of Bugman's XXXXXXX on his hip, I decided he must have smashed his way into a brewery and used more Mantic TerrainCrate stuff to put some barrels on his base. Next to him is Bruinen the Wise. He's a giant from Atlantis Miniatures (now Blue Giant Studios), though doesn't seem to be available any more. I liked him as he seemed to have a sort of druidic vibe that I thought fit with Cachtorr and Bologs, so decided the three of them could be the Wanderers of Albion. He looks sort of more with it than most of the other giants, so I figured he could be called 'the Wise' - like, he can talk in full sentences or use long words. I don't imagine the threshold for being considered wise is particularly high in giant society! 

Again, Bruinen isn't on a properly legal base, but he was just too big and it looked daft, so I put him on a slightly bigger one. I think it looks much better, and helps him stand out as the leader of that mob. He's bigger than the rest of the Mancrushers but not big enough to be a Mega Gargant. I think some variation in size is good, and the fact he is a bit bigger makes it more likely he would be bullying the others around - just like his counterpart, Fat Glurg! This is a Hill Giant from Nolzur's range of D&D monsters. It's a great model, cheap as chips and a single piece (I know they have a new Frameworks version, this is the older flexible plastic one). The detail is OK on it and he is chunky enough that the flex isn't a problem. As he is a bit bigger, I put him on the same size base as Bruinen and decided he could be the bigger, fatter, brother of Dronk and Grumbog, bossing them both around - he's clearly taken the loot for himself and stuck it in his pack!  

Grumbog Aleguzzler, Bruinen the Wise and Fat Glurg

Might makes right in the Stomper Tribe, so there's no mistaking that Magbragog is clearly in charge, with Bruinen and Fat Glurg commanding the two mobs of Mancrushers.   

Magbragog's Stomper Tribe - so far...


What's Next?

I have another three Mega Gargants assembled and ready for painting: Warstomper, Hrothgar Icebreath; a Kraken-Eater, Odler the Colossus; and Tarbag Dragon-Smasher, the Gatebreaker. 

And then there are a couple more Mancrushers, a Bonegrinder and a couple more Mega Gargants to assemble... lots to do, I think in the end it will be pushing 5,000 points! I'll be hoping to arrange a massive game for the tribe to take on all-comers at my local club, Black Hole Wargamers... that could be a long one! 

So far, the Tribe have been pretty successful in the games I've played with them - I've written up their adventures stomping all over the Realms previously. I've found them good fun to play, but some of my opponents have been a bit dismayed when they've been unable to take them down. As I've said to them, you only need to take out one or two Mancrushers to start really taking a toll on the army, so I think focused fire is probably the way to go... I haven't played any games with the newest rules yet, but I've got one coming up next month so we'll see how Magbragog and his lads get on then. 

I haven't considered the new Beast Smasher variant yet, but I figure that Hrothgar would work well if I want to use him as one (he's covered in pelts and things, very beastly). Likewise haven't really thought about King Brodd, the new ruler of all the giants. I've heard he's pretty useful in the game, but I'm not really taken with the model - it's just a minor variation on GW's normal Mega Gargant and, although the model is awesome, I'm not convinced about the variations they've made for him. The big club is nice, but other than that... besides, I'm too taken with Magbragog, he's my giant boss! I think he'll have to proxy in for the king and use Brodd's rules if I ever want to do that. 


Magbragog's battles against the Pipsqueaks

Taking on the flying machines of the Kharadron Overlords

Brutal battle against the Beasts of Chaos

Taking on the Stormcast Eternals

Fighting a combined Order force


The land will tremble as the Stomper tribe marches forth in search of food, ale and a good scrap! 

Thursday, 7 July 2022

Ruined Town Terrain - Warlord Games Ruined Hamlet

Ruined Town Terrain

I wanted to build a really good set of terrain to fill a table and that could be used for multiple games - including Warhammer, Bolt Action, Black Powder, Dungeons & Dragons and Frostgrave - so I wanted it to have a fantasy feel, but also work for historical games. I wanted it to be versatile so that I could change the layout easily, and so it could work for both the larger wargames and smaller skirmishes. It really needed the ability to act as a line of sight blocker and obstacle for a larger wargame, while providing opportunity for individual models to get in and hide or climb up to vantage points. Luckily, I found a really good and affordable option!  


Ruined Hamlet

The Ruined Hamlet set from Warlord Games looked perfect. it is primarily designed for Bolt Action (so a World War II setting), but as they say on the packaging, it works for older historical settings too. And the rough stone would look perfect in a fantasy setting. 

I wanted to make the ruins look interesting and distinct and, although it looks fairly uniform on the box, the fact that the whole set is plastic and comes in individual pieces meant I knew that, with a little bit of work, I could chop and change it into all sorts of buildings. There are three farmhouses in this set. They also used to sell them individually. I think in the end I got about 8 of the individual houses (after buying one or two initially to test them out). The key was going to be making an interesting set of ruins that didn't look like 8 of the same house.


Building

I didn't add any additional kits to the ruins - they're so versatile, I didn't have to. The only additional materials I put on the structures were some cut up lollipop sticks and balsa wood that I used to bulk out some of the rafters, create walkways between raised platforms, and cover some of the holes in the walls. My main focus was on playability - I wanted the option for players to cross over between higher platforms to gain good vantage points to attack those below, and wanted to fill some of the holes in the walls so that they could properly hide. From a narrative point of view, I figured that these ruins had been fought over for some time, so whoever had been occupying them had been fortifying their position. Doing this still made them work really well for mass battle wargames. 

My wife commented that I was wrong for adding balsa wood doors to some of the doorways, but I think they look good - and there's every chance that a few doors would remain largely intact in the ruins! 


Basing

I use 3mm HDF for basing terrain pieces like this. I like having a solid base, means I can plonk it on the table and it's easy to see the outline of it, plus it keeps the whole thing together and strong. I positioned the pieces on the wood, drew the rough outlines, then cut them out with a jigsaw and fret saw, to maximise the use out of the HDF. I use two-part epoxy (araldite) to fix pieces like this onto the bases, so they are very solid - I think terrain needs to be nice and strong for gaming with. 

After that, the bases were covered in sand, grit and small stones, stuck with watered-down PVA glue. Going up the walls of the ruins a little bit in places really makes them blend in and seem like they've been losing little bits of rubble over time.  


Painting

I started off by undercoating with black spray paint, then grey over the top of that. Laying the pieces out on a 3x3' table with some other premade pieces and a couple of more fantastical work-in-progress pieces of terrain (some of the pieces ended up with my set of Fantasy Temples) looked really good, covering the area completely. This would make an excellent table for Frostgrave with a little bit of scatter terrain, with lots of winding streets, alleyways to hide in and vantage points to climb to. 

I wanted to keep the painting process fairly simple and quick. I've got a lot of things in my pile of unpainted miniatures so I didn't want to take too long over these ruined buildings. I also thing that the terrain is a really important part of a game, but it is primarily the backdrop for the miniatures - if the terrain is more detailed and colourful than the models, it can detract from them. The strong detail on these kits make painting them a real easy job as there is a lot of relief, making them the ideal candidates for heavy washes and drybrushing. I simply painted the patches of plaster with GW Karak Stone, as it gave a good contrast to the underlying grey stones. I didn't want to mess about with different coloured bricks so just left them all as the grey undercoat. 

All the wood was painted with dark browns, with some heavy drybrushing of lighter brown on them (I can't remember exactly which ones, but it doesn't really matter - dark brown and light brown are fairly self explanatory!). 

That was it for blocking in the simple colours, just three elements really. I left the ground as grey as well - I've been doing that with a lot of models recently, it looks like a sort of rocky wasteland or urban rubble, which looks great with some static grass or tufts added on. In this case, I would imagine the ground to be covered in grey dust and rubble from all the destroyed buildings. 

I used Army Painter Strong Tone Quickshade for washing. This is a brownish colour, so adds a really natural depth and contrast to the models. I've been using the water-based dropper bottles of these quickshades for years, but recently tried using the oil-based cans when painting scenery - much more cost effective for a large volume of shade. I find that the quickshade needs a bit of thinning with white spirit to flow smoothly (use an old knackered brush for this!). The detail on these stone walls is so well defined that the shade easily goes into all the crevices and really makes the piece look good. I found that there wasn't even any need to go back and drybrush or highlight afterwards - just the wash itself was enough.


There are some issues with the quickshade. It dries glossy, but not to worry, as soon as you spray it with a matt varnish it looks great! The photo below shows a piece looking shiny (pre-matt varnish) while the one below that shows two pieces side-by-side - the left-hand piece has been matt varnished, which takes that sheen off it. 

The other issue is the drying time. I had an older can of quickshade which was still tacky 6 or 7 days later. It's supposed to dry in 24-48 hours. This can worked well for me on my last lot of terrain, but was still quick sticky after 2 or 3 days - perhaps because of the humidity, I don't know. Either way, I was a little bit impatient with the static grass, and found that there was enough tackiness in the quickshade to cause some of the grass to stick up the walls, where there was no PVA to adhere to. It's a bit annoying, but not too noticeable unless you look closely. Some hints of green on the walls are OK for this sort of thing where some weeds might be growing on the ruins, but wouldn't be ideal on a lot of things. But that was probably down to my impatience more than anything, though the shade should have been dry by then. That's not an issue with the farmhouse ruins anyway! 


Applying the static grass was the final step before spraying with matt varnish. I used a Flockbox for this - a static grass applicator that uses an electrical charge to cause the static grass to stand up in the glue when it's passed through a metal sieve (or can cause the grass to jump up from the plat and onto the miniature). For convenience on smaller miniatures, I tend to use pre-made grass tufts - it's much quicker and easier. But the Flockbox is great for making larger patches of grass, really showing nature gradually reclaiming this ruined town. I was also able to combine a couple of different colours of static grass together to add some variation.  


 Complete!

I took some photos of the full set of ruins out in the sunshine, with some of my D&D characters for scale. 


I certainly could have gone further with the detailing on this project - added some small bushes, vegetation growing out of the walls, highlighting the details a bit more, adding some additional colours to the stonework... waiting a little longer before flocking it so the flock didn't stick to the walls (actually, matt varnishing before as well as after the flocking might actually have been the answer)… but this was intended to be a relatively quick and dirty project, to get a good result on the tabletop without taking forever to complete. It took long enough as there was a big hiatus between construction and painting due to other projects and real life distracting me from it! Overall, I'm very pleased with the finished result, as it looks effective and achieved my objective of not taking too much time. It was also very cost effective and made great use of a single plastic kit. 

I think this shows the versatility of these ruined farmhouses from Warlord, as, with a little bit of cutting and ingenuity, I've ended up with a wide array of terrain to fight over that looks like it all fits together but is varied and visually interesting. Plus, the hard plastic is extremely robust and will stand up to having models placed all over it, something that some other materials struggle with. I've used this terrain in a few games prior to it being complete, and it works really well from a gameplay perspective. Now it will also look good whilst we're playing! 


Final Thoughts

This is a great terrain kit with a lot of versatility to it if you are willing to chop it up and experiment with different ways to put it together. The simple addition of a few pieces of balsa or lollipop stick helps transform the kit into an exciting setting for a skirmish game. Aesthetically, it looks great and the detail takes paint very well. These ruined farmhouses fit in perfectly in a variety of historical and fantasy settings and are well worth buying to accompany a number of mass battle or skirmish miniature games. 

You Might Like:

  • Design fits into multiple historical time periods and fantasy settings
  • Hard plastic is robust and easy to work with
  • Kit is highly modular and customisable
  • Sculpted detail is good, enabling quick painting with washes / drybrushing

You Might Not Like:

  • This is a model kit that requires assembly and painting, and a fair degree of modelling experience to get the most out of it - not recommended for novice modellers

Rating:

  • Aesthetic: 4/5
  • Difficulty: 4/5
  • Modularity: 5/5
  • Playability: 5/5
  • Quality: 5/5
Overall Score: 92%

Saturday, 19 February 2022

Road to Apocalypse: 10. Where Next?

Road to Apocalypse: 10. Where Next?

13 February 2022

👈 Part 9: The Final Battle


Da Boss lookin' fer da next skrap

So this was it, the final battle. It had all been leading up to this for the last few months - all the painting and practice battles. The Modelling Exhibition at Midhurst, the final showdown between the forces of the Imperium and the WAAAAAAGH! that had been steadily growing. Of course, the Orks won in the end - they always do! And if they don't then they can always come back for annuver go, so it doesn't count... or, if they're dead then they're dead, so that doesn't count neither. But this time they did win and soon there'll be a tide of Greenskins invading planet after planet - good job boyz! 

The question is, what's next? I've got a tonne of old Orks that need painting up. This sort of game is a great way to get enthusiasm and inspiration to get things painted up, and playing that massive game with fully painted armies looked fantastic. So, I definitely want to keep some momentum going and paint the rest of my Orks (though there are a few other games taking my eye at the moment as well...). In addition to that, I would definitely like to play more Apocalypse games, and I have some plans for some more large vehicles to add. The Big Meks will be busy on Midhurstian Prime for a while building these engines of destruction!

I got this Micro Machines fire and rescue plane, which I think is going to look great as a large Bommer (just look at it compared to my Dakkajet!). There's no rules for a massive bomber, but I'm sure something could be worked up. Perhaps modify a Marauder bomber's stats... Anyway, it should be cool. 


I've seen a couple of great conversions using different AT-AT models. My vision for this one will be to make a mechanical Gargantuan Squiggoth. The only problem with that is using it in regular 40K, because they seem to have nerfed the big Squig and taken away most of its guns... in that case it could possibly be another Stompa. The nice thing about Orks is just building things and making them work as SOMETHING!  

Talking of Stompas, I've wanted to scratch-build another one for ages. This one is going to be a Kustom Stompa (or Mekboy Stompa) with a Lifta-Droppa arm and a big Belly Gun. I'm going to model it largely after the old Great Gargants in Epic, but it won't be much taller than the 'normal' Stompa.   


Finally, there's something I've been keen on doing for a long time. Tom managed to get his Battle Fortress assembled from a Baneblade for the Midhurst battle, and it looked great. It didn't perform particularly well, though it did soak up a lot of firepower. Perhaps it needs to be used more like the Stompas, grinding forwards with a load of Orks inside? Because it has so many guns, the temptation is to sit it on Aimed Fire orders all game, but as with most Ork shooting it can often be lacklustre. But, with a decent transport capacity, that might be the way forwards... Anyway, I'll be using bits from this kit on the other conversions, and turning this into something that hopefully looks good.   


I definitely need a bit of a break from Apocalypse and some time playing something else. But I'm looking forward to playing it again. There are many aspects I like, and I think it will be a good way to play smaller games too - just to get models on the table and keep things simple (playing with some other friends like Robert, who has a lot of Space Marine tanks that will be perfect for this sort of game). It will be worth trying out One Page Rules as well, that is getting a lot of traction at the club right now. They have a regular 40K game as well as an Apocalypse-equivalent. 

A good goal would be to try and get more of my boyz painted up, some of these conversions, then play a big game with me controlling all the detachments! Maybe taking on Dave's pointy-eared Eldar some time down the line... that would be interesting! 


FIN  


Road to Apocalypse: 8. Goff Aggression

Road to Apocalypse: 8. Goff Aggression

12 February 2022

👈 Part 7: Job's a Good 'Un

👉Part 9: The Final Battle


Brother Lytharus groaned in pain as he looked towards the horizon. Belching black smoke told him that the Orks were in pursuit. The rest of his Deathwatch Kill Team had been eliminated by the foul Greenskins, and now it was down to him to try and relay what he had found out to his superiors in the Ordo Xenos. Unfortunately, something about the strange technology the Orks were using was causing trouble with his long-range vox transmitter, so he had been unable to send the data packet off-world. He just hoped that his distress beacon could still be located - not for his own benefit, but to accomplish his mission. He had seen the gathering Ork forces, and this was no ordinary invasion. More than one of their degenerate 'Klans' were present on the planet, a sure sign that a particularly dangerous Warboss was leading the Orks - it was the only way that the animosity between them could be kept in check. Yes, this was the beginnings of a true WAAAAGH!, and there could be dire consequences for this whole sub-sector if it wasn't dealt with quickly enough. 

The Deathwatch Marine coughed up blood into his helmet. He could go no further. As he slipped in and out of consciousness, he said a prayer to the Emperor to ask for forgiveness for failing in his mission. Greenskins were coming to finish the job, and he had not the strength to resist... but, what was that? The unmistakable trails of drop pods in the sky. Could it be? Yes, the blessed Emperor had answered his prayers - his brother Astartes had located him! Lytharus tried to stand but could not. He would have to wait right here and hope that his rescuers got to him before the Orks did... 


Road to Apocalypse: 9. The Final Battle

Road to Apocalypse: 9. The Final Battle

13 February 2022

👈 Part 8: Goff Aggression

👉Part 10: Where Next?

We's gonna stomp you!!

So this was it, the final battle. It had all been leading up to this for the last few months - all the painting and practice battles. The Modelling Exhibition at Midhurst, the final showdown between the forces of the Imperium and the WAAAAAAGH! that had been steadily growing.  

+++++ INCOMING TRANSMISSION +++++
+++++ PRIORITY: ALPHA +++++
+++++ CLEARANCE LEVEL: VERMILLION +++++
+++++ STRATEGIC VALUE: ABSOLUTE +++++
+++++ THREAT IDENTIFICATION: XENOS | ORKOID +++++ 
+++++ PRIORITY DISPATCH REQUIRED TO MIDHURSTIAN PRIME +++++
+++++ ORK WAAAAAAGH! DEVELOPING ON MANUFACTORUM WORLD +++++
+++++ MUNITIONS PRODUCTION OUTPUT CEASED +++++
+++++ SUB-SECTOR SECURITY THREATENED WITHIN 5 STANDARD DAYS +++++
+++++ ADEPTUS ASTARTES SURGICAL STRIKE REQUIRED +++++
+++++ ADVISEMENT: SIGNIFICANT ARMOURED VECHICLE PRESENCE +++++

### CUT OFF THE HEAD AND THE BODY WILL DIE ###


Road to Apocalypse: 7. Job's a Good 'Un.

Road to Apocalypse: 7. Job's a Good 'Un

👈 Part 6: Reflections of a Warboss

👉Part 8: Goff Aggression


After a few games of Apocalypse to hone the list a bit, I was feeling pretty good about where to focus my painting efforts. Yes, it would be great to get more of my dozens of boyz painted up, but it was all about clanking vehicles - Dredds, Dredds and more Dredds! I also knew I had to get Ghazghkull painted up, and the Mek Gunz had proven invaluable for their accurate (for Orks) shooting. Plus, I knew the Imperial list in the final battle was likely to be very flier-heavy, and there aren't many anti-air options available to the Orks. 

These are all just some quick snaps with the phone as I was finishing off these models. I'm going to get them in front of a proper camera with lights and things when I get a chance, and I think I might even do some step-by-step WIP posts on at least some of them - I have a load of pictures of the models during assembly and painting, so when I get a chance I'll do something with that. For now, here are the things I was getting prepared for the final couple of battles! 


The Final Army List


+++ Waaaagh! Da Goffs (Warhammer 40,000: Apocalypse) [150 PL] +++

++ Supreme Command Detachment (Orks) ++

+ HQ +

Ghazghkull Mag Uruk Thraka, Prophet of Da Waaaagh! - Warboss of Warbosses: Kustom Klaw, Twin Big Shoota. WARMASTER. 

Ork Mek Boss Buzzgob - Big Mek: Kustom Force Field, Mek Arms, Nitnuckle and Lunk (Grot Oilers).

Gulskrag Thraka - Warboss: Boss Weapons. 

+ Elites +

Gulskrag's Tuffgitz - 6 x Ork Meganobz 

+ Lord of War +

Da Great Green Gitkilla - Stompa: 2 extra Supa Rokkits. 

++ Spearhead Detachment (Orks) ++

+ HQ +

Buzzmek Geargrinda - Big Mek: Kustom Force Field. Warlord.

+ Elites +

Old Man Lo-Ghaz - Nob with Waaagh! Banner 

+ Heavy Support +

Orktimus Prime - Deff Dread: 2x Kustom Mega-Blasta, 2x Dread Klaws

Gitslasha - Deff Dread: 2x Dread Saws, 2x Dread Klaws

Buzzmek's Ruzzbot - Morkanaut: Kustom Force Field

++ Spearhead Detachment (Orks) ++

+ HQ +

Deadeye Dregmek - Big Mek: Shokk Attakk Gun. Warlord.

+ Heavy Support +

Dregmek's Wagon - Gunwagon: Kannon.

Lifta-Droppas - Mek Gunz: 2x Traktor Kannons

Pulsa Rokkit - Mek Gunz: 1 x Bubble Chukka

Da Kannons - Mek Gunz: 2 x Smasha Guns

++ Battalion Detachment (Orks) ++

+ HQ +

Da Amayzin' Bozgit - Weirdboy. Warlord.

+ Troops +

Dagratz Ladz - 10 x Slugga Boyz.

Snikrot's Sneaky Slittas - 10 x Slugga Boyz

Snotty Grotz - 30 x Gretchin


Saturday, 27 November 2021

Tokens and Markers

Just a quick post of some bits and pieces I've painted up recently, for use in D&D and any other games. They've all been quick painting pieces in between doing other bits (while other things were drying), but should be useful.

Winged Serpents - Wyverns

Wyverns are the belligerent, uncouth cousins of true dragons. They're smaller, can't breathe fire or any other dangerous substances, but they have a mean streak and are always hungry. The perfect mounts for orcs. Naturally, as Orcs & Goblins were my first army and always hold a special place for me, I have collected a few wyverns over the years. These ones all have orc riders, but I have one more awaiting assembly that I am going to leave rider-less, to use as a monster in D&D. 

These three wyverns really show a snapshot of my painting from many years ago. They are all old models, and one of them was the first big model I ever painted, well over 20 years ago. 

I've posted about my dragons here, and compared these three wyverns to the imposing Carmine Dragon below - they're not nearly as big, but you still wouldn't want to see one dropping out of the sky towards you!  


Thursday, 25 November 2021

My wings a hurricane, and my breath death! - Dragons #1

Dragons. They are the archetype of fantasy monster, and I love 'em. Perhaps it's their similarity to dinosaurs that draws people in, perhaps the mixture of nobility and cruelty that they are often characterised with... they're right there in the name of the game, Dungeons & Dragons, so they've got to be special. Of course, Smaug from The Hobbit is a classic (I used part of one of his speeches for the title of this post), but I've also been listening to R. A. Salvatore's Drizzt Do'Urden series of books recently and the title character had this to say on the subject of dragons:

Never Look a Gift Dragon in the Mouth

We finally had a face-to-face game of D&D after almost a year of remote videocall sessions, and the players surprised me with an awesome dragon miniature (and a bottle of whisky, which went down very well! And everyone was surprised with an artist's depiction of the adventuring party too!). 

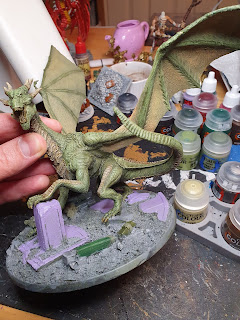
The dragon is a lovely kit from Zealot Miniatures and I knew I wanted to get it painted up straight away rather than have it sit on a shelf for months on end, and I figured it would be nice to keep the group updated with the progress.

I decided she was going to be a Green Dragon - I have plans to have the full bestiary of the primary Chromatic Dragons painted up at some point in the future (3 so far, including this one!), and there was something about this one that screamed GREEN to me. I later discovered that Zealot had painted her green as well on their web site, coincidentally. 


Components

All the components looked good, no obvious damage or flash or anything. Nicely casted model. Also had lots of good, long lugs built into it for assembly, so I figured it probably didn't need pinning. 

Assembly

Dry-fitting the components,  there were a few gaps that were going to need filling, but they were fairly minor. There weren't any instructions in the packet, but it was all self-explanatory. I liked the big column she was resting a foreclaw on and decided that an extra bit of masonry under a back foot might help with balance. 

I figured the best base to put her on would be a 130mm round base (same as the GW Mega-Gargants), as she fit on it really nicely. Those spread wings made me consider something larger, but it wasn't necessary (plus I was working on another Red Dragon on the same size base, so they would look good next to one another).


Filling 

The gaps were minor so just needed some liquid green stuff, no need for getting out the big guns on it. The largest gap was the right cheek, but was easily sorted. 


Basing

I canvassed opinions from the group on what to dress the base with. On previous dragons, I have tended towards a lair-type scene, with piles of treasure and captured weapons from those unwitting fools who have tried to steal that treasure. The overwhelming opinion was to put some dead bodies on this base, and I agreed that the damaged stone column here lent itself towards the dragon attacking some sort of temple or building or something, so perhaps a couple of dead defenders on the ground wouldn't go amiss... I also figured that I might be able to find something that looked vaguely like at least one of the adventurers, to show them meeting their doom at the hands of the dragon! 

Finding good dead bodies was a bit of an issue. I finally got one paladin-looking model, a metal one from Reaper. He was supposed to be filled full of arrows, but I figured I could fill the arrow holes with green stuff and he'd be dragon food instead. He was reminiscent of Guillerme too, so I made sure he had a glaive laid across his fallen body. The other victim was a dead dwarf that I found on Etsy, and I put him on some stairs that I already had to add a bit more height variation to the base. 

After that, I threw on some more interesting masonry bits (GW large basing details), some larger rocks, and finally a mix of grit and sand to get a nice varied texture (my standard basing technique nowadays). Overall, I was really happy with the level of detail - enough to make it really interesting, without taking away from the dragon herself.


Undercoat

I bought some Death Guard Green spray to see if that could help speed-paint my Orks, and figured this was a good opportunity to use it. I put it over a Chaos Black undercoat, keeping it fairly light so that there was a bit of shading created. 


Initial painting

I decided to start off by using Militarum Green (Contrast paint) on the main scales, as a sort of heavy wash. I left it off the wing membranes and the thicker armour plates as I didn't want them becoming a deeper green - weirdly, this step made them look really strange in the photo as the Death Guard Green suddenly looked much paler next to the Militarum Green on top of the basecoat.

I then went with Aggaros Dunes (another Contrast) directly on top of the Death Guard over the thick bony plates - this worked really well to get an interesting brown colour with a hint of green still coming through.


Drybrushing

The great texture on this model made it an excellent candidate for drybrushing. I went for layers of Straken Green, Orruk Flesh and Ogryn Camo. These green layers went all over the Militarum Green, and also lightly onto the wings. I then decided to add some fleshy colours to the wing membranes, using an old (properly old and beautifully hexagonal!) pot of Bronzed Flesh, then a little Army Painter Fair Skin for a real gentle drybrush. That did come out a little heavier on one wing than I wanted, so I brought it back with a bit of green over the top. 

The bony scales and horns were drybrushed with Army Painter Otyugh Brown, making them a nice deep bony colour. 

Overall, I liked the subtlety of the colours and gentle transitions from scales to wings, it felt quite natural. 


Base and Final Details

Using my colour wheel, I could see that purple was directly opposite green, which was handy as I had already thought adding an element of purple to the base would be more interesting than doing all the stonework in grey! I used Army Painter Beholder Purple for that, then used Gryphhound Grey Contrast to dull it down significantly, before the wash that was going to be applied to the entire base (thinned down Army Painter Strong Tone). I was really pleased with that, it made the column and bits of broken masonry on the ground interesting without overpowering.

I ensured the claws and teeth were picked out in bone and painted the dead bodies up with simple colours that would, again, stand out from the grey but not be too distracting. I applied a liberal amount of Blood for the Blood God after the wash, including some around the dragon's mouth (she's a messy eater). I knew that the matt varnish was going to dull this glossy blood down, but I like the effect you get of doing that and then reapplying the blood paint over the top of the varnish - you end up with some dull, dried patches of blood as well as some glistening, fresh stuff. I also added a couple of patches of dark tufts to the outside of the base, maybe representing that she's crashed through a wall and there were some patches of vegetation just outside... mostly it just broke up the side of the base opposite the corpses. 

I made sure to put pupils in the glowing red eyes and, with that, she was finished and ready for varnishing with Munitorum Varnish! 


Complete!

The great wyrm complete! Overall, I think it was sitting down for seven modelling / painting sessions from start to finish, taking me just over four weeks (in between toddler watch and other things). So fairly quick compared to models I've done in the past. I was considering doing more to her - tinkering about with a little more drybrushing with even starker highlights here and there, maybe playing with a little extra shade in some of the deeper recesses. But, overall, I am really pleased with the overall effect and figured that the massive piles of grey plastic I have around the house would be more of a priority than tinkering any more on this dragon. Besides, I was concerned that I might overdo something and have to fix it, which would be a pain! 

I took some nice photos and called her done. I just need to sort out a transportation solution for her (the wings are too big to fit in a standard KR case, so will have to think of something else). I took some more photos to compare her with other dragons and wyverns I've painted in the past, so will post that soon. 

She just needs a name - perhaps Venomthrax, Scourge of the Verdant Plains?