Element Games - discounts on miniatures and hobby supplies!

Element Games - Wargaming Webstore
Showing posts with label WIP. Show all posts

Monday, 9 January 2023

Constructing an Orky Settlement

Inspiration!

Back in the early '90s, I pored over these sorts of images for ages in White Dwarf magazine, imagining how these battles played out. I loved seeing the wacky, colourful Orks facing off against the puny humans or poncy Eldar, particularly when they were defending their ramshackle townships (probably erected in the ruins of whatever Imperial settlement the Orks had recently razed to the ground). Although it's easy to always see Orks as the perennial invaders, I loved the idea of recreating an Ork settlement and thinking about what that would look like. These blocky, sand coloured buildings always stood out for me and, though junk buildings made out of scrap have become a bit more the norm, I really wanted to have some of these for myself. 

Objectives

I had a few objectives in mind for making these buildings:

  • Make them quick and easy to build using polystyrene I already had knocking about
  • Replicate that old '90s look
  • Be simple buildings to block line of sight and provide good gun emplacements, so good for gaming
  • Provide an opportunity for my young daughter (she was 2 at the time) to paint them with me 
So nothing too fancy, cheap and cheerful and fun for gaming. I don't think there's anything overly complicated about constructing them, but I thought I would do a sort of step-by-step in case anyone needed inspiration. They certainly made a good project to do with a toddler, succeeding in entertaining the toddler and giving me something I could use in my games of 40k! 

Construction

I had a bunch of blocky polystyrene in the shed to use up. I cut it with a mixture of a big sharp knife (one I actually forged myself!) and a hot wire cutter. The hot wire cutter is an antique relic from the old days of Games Workshop that I still had in my toolbox! I found that the knife was generally better for getting flat surfaces on the big blocks, but the hot wire cutter is good for smaller bits. 

I roughly planned out three buildings of different sizes and shapes (Ork architects don't conform, of course!). I used PVA for sticking the blocks together, with cocktail sticks stabbed in for additional support and holding the pieces together. These worked very well - you could almost get away without the glue. Obviously I kept the toddler away for this stage! 

For this first bunch of buildings, I just wanted them to have a stone parapet round the outside. I had some thinner polystyrene sheets as well, so I used those to encase the larger blocks to make solid walls from ground up to the parapet. I used the Ork models to make sure they were about the right height for providing cover but letting the boyz shoot over the top. Nothing too precise, again, but fairly uniform.   


Painting

I used super cheap poster paints to do these. I mixed up tubs of paint, PVA, sand and water to get a consistency I liked, then used that straight onto the polystyrene. The sand gave it a good texture, the PVA stuck it all together and helped fill in any gaps in the polystyrene blocks. The mixture also made the outside tougher, good for gaming. They dried out in the sun and I was really pleased with the results - looked just like what I was after. The little squig had a good go at painting them as well, she enjoyed herself. 

After they had dried, I stuck on some doors, trapdoors and ladders that I made out of lollipop sticks and painted brown. Then I painted grey on the bases to match my gaming mats and did some simple black and white patterns. A lot of the inspiration pictures have more colours on them than this, but my main klan is Goffs so I kept it simple - just pushing the boat out by doing one of them with dags instead of checks! Again, being that it would have been Orks painting it, I didn't measure or draw guidelines, just got the poster paint out and slapped it on! 


Second Generation

I had a couple more polystyrene blocks that were a bit more dense and just the right size for some Orks to stand on, so I made a couple more buildings! This time, I wanted to try using some scraps of wood for palisades round the roof, so I chopped up some lollipop sticks and made some rough walls. These were all glued together using PVA and left to dry before painting them brown and then attaching to the painted buildings. I used PVA again, as well as securing them into the polystyrene with small nails - if these showed on the outside then they would look like whacking great Ork nails anyway! It definitely helps to think a bit like an Ork when doing things like this, and not getting too bogged down in details. The PVA was still drying when I took the photos, I'll have to take some more when I finish doing the bases of these ones, but as they stand I reckon job's a good 'un! 


Final Thoughts

These buildings will easily fill enough of a decent table (along with some suitable scatter terrain) to provide plenty of cover and an interesting battlefield to fight over. They were super cheap to make and good fun with a little helper. I might come back to do a little more details in the future - maybe some more colourful patterns, possibly some graffiti, maybe a bit of a wash on the bases and woodwork. But I'll see, part of me is really happy with them as they are, super simple and effective. They don't need to be overcomplicated. Besides, the boyz wouldn't be bothered about that sort of thing! 

Thursday, 7 July 2022

Ruined Town Terrain - Warlord Games Ruined Hamlet

Ruined Town Terrain

I wanted to build a really good set of terrain to fill a table and that could be used for multiple games - including Warhammer, Bolt Action, Black Powder, Dungeons & Dragons and Frostgrave - so I wanted it to have a fantasy feel, but also work for historical games. I wanted it to be versatile so that I could change the layout easily, and so it could work for both the larger wargames and smaller skirmishes. It really needed the ability to act as a line of sight blocker and obstacle for a larger wargame, while providing opportunity for individual models to get in and hide or climb up to vantage points. Luckily, I found a really good and affordable option!  


Ruined Hamlet

The Ruined Hamlet set from Warlord Games looked perfect. it is primarily designed for Bolt Action (so a World War II setting), but as they say on the packaging, it works for older historical settings too. And the rough stone would look perfect in a fantasy setting. 

I wanted to make the ruins look interesting and distinct and, although it looks fairly uniform on the box, the fact that the whole set is plastic and comes in individual pieces meant I knew that, with a little bit of work, I could chop and change it into all sorts of buildings. There are three farmhouses in this set. They also used to sell them individually. I think in the end I got about 8 of the individual houses (after buying one or two initially to test them out). The key was going to be making an interesting set of ruins that didn't look like 8 of the same house.


Building

I didn't add any additional kits to the ruins - they're so versatile, I didn't have to. The only additional materials I put on the structures were some cut up lollipop sticks and balsa wood that I used to bulk out some of the rafters, create walkways between raised platforms, and cover some of the holes in the walls. My main focus was on playability - I wanted the option for players to cross over between higher platforms to gain good vantage points to attack those below, and wanted to fill some of the holes in the walls so that they could properly hide. From a narrative point of view, I figured that these ruins had been fought over for some time, so whoever had been occupying them had been fortifying their position. Doing this still made them work really well for mass battle wargames. 

My wife commented that I was wrong for adding balsa wood doors to some of the doorways, but I think they look good - and there's every chance that a few doors would remain largely intact in the ruins! 


Basing

I use 3mm HDF for basing terrain pieces like this. I like having a solid base, means I can plonk it on the table and it's easy to see the outline of it, plus it keeps the whole thing together and strong. I positioned the pieces on the wood, drew the rough outlines, then cut them out with a jigsaw and fret saw, to maximise the use out of the HDF. I use two-part epoxy (araldite) to fix pieces like this onto the bases, so they are very solid - I think terrain needs to be nice and strong for gaming with. 

After that, the bases were covered in sand, grit and small stones, stuck with watered-down PVA glue. Going up the walls of the ruins a little bit in places really makes them blend in and seem like they've been losing little bits of rubble over time.  


Painting

I started off by undercoating with black spray paint, then grey over the top of that. Laying the pieces out on a 3x3' table with some other premade pieces and a couple of more fantastical work-in-progress pieces of terrain (some of the pieces ended up with my set of Fantasy Temples) looked really good, covering the area completely. This would make an excellent table for Frostgrave with a little bit of scatter terrain, with lots of winding streets, alleyways to hide in and vantage points to climb to. 

I wanted to keep the painting process fairly simple and quick. I've got a lot of things in my pile of unpainted miniatures so I didn't want to take too long over these ruined buildings. I also thing that the terrain is a really important part of a game, but it is primarily the backdrop for the miniatures - if the terrain is more detailed and colourful than the models, it can detract from them. The strong detail on these kits make painting them a real easy job as there is a lot of relief, making them the ideal candidates for heavy washes and drybrushing. I simply painted the patches of plaster with GW Karak Stone, as it gave a good contrast to the underlying grey stones. I didn't want to mess about with different coloured bricks so just left them all as the grey undercoat. 

All the wood was painted with dark browns, with some heavy drybrushing of lighter brown on them (I can't remember exactly which ones, but it doesn't really matter - dark brown and light brown are fairly self explanatory!). 

That was it for blocking in the simple colours, just three elements really. I left the ground as grey as well - I've been doing that with a lot of models recently, it looks like a sort of rocky wasteland or urban rubble, which looks great with some static grass or tufts added on. In this case, I would imagine the ground to be covered in grey dust and rubble from all the destroyed buildings. 

I used Army Painter Strong Tone Quickshade for washing. This is a brownish colour, so adds a really natural depth and contrast to the models. I've been using the water-based dropper bottles of these quickshades for years, but recently tried using the oil-based cans when painting scenery - much more cost effective for a large volume of shade. I find that the quickshade needs a bit of thinning with white spirit to flow smoothly (use an old knackered brush for this!). The detail on these stone walls is so well defined that the shade easily goes into all the crevices and really makes the piece look good. I found that there wasn't even any need to go back and drybrush or highlight afterwards - just the wash itself was enough.


There are some issues with the quickshade. It dries glossy, but not to worry, as soon as you spray it with a matt varnish it looks great! The photo below shows a piece looking shiny (pre-matt varnish) while the one below that shows two pieces side-by-side - the left-hand piece has been matt varnished, which takes that sheen off it. 

The other issue is the drying time. I had an older can of quickshade which was still tacky 6 or 7 days later. It's supposed to dry in 24-48 hours. This can worked well for me on my last lot of terrain, but was still quick sticky after 2 or 3 days - perhaps because of the humidity, I don't know. Either way, I was a little bit impatient with the static grass, and found that there was enough tackiness in the quickshade to cause some of the grass to stick up the walls, where there was no PVA to adhere to. It's a bit annoying, but not too noticeable unless you look closely. Some hints of green on the walls are OK for this sort of thing where some weeds might be growing on the ruins, but wouldn't be ideal on a lot of things. But that was probably down to my impatience more than anything, though the shade should have been dry by then. That's not an issue with the farmhouse ruins anyway! 


Applying the static grass was the final step before spraying with matt varnish. I used a Flockbox for this - a static grass applicator that uses an electrical charge to cause the static grass to stand up in the glue when it's passed through a metal sieve (or can cause the grass to jump up from the plat and onto the miniature). For convenience on smaller miniatures, I tend to use pre-made grass tufts - it's much quicker and easier. But the Flockbox is great for making larger patches of grass, really showing nature gradually reclaiming this ruined town. I was also able to combine a couple of different colours of static grass together to add some variation.  


 Complete!

I took some photos of the full set of ruins out in the sunshine, with some of my D&D characters for scale. 


I certainly could have gone further with the detailing on this project - added some small bushes, vegetation growing out of the walls, highlighting the details a bit more, adding some additional colours to the stonework... waiting a little longer before flocking it so the flock didn't stick to the walls (actually, matt varnishing before as well as after the flocking might actually have been the answer)… but this was intended to be a relatively quick and dirty project, to get a good result on the tabletop without taking forever to complete. It took long enough as there was a big hiatus between construction and painting due to other projects and real life distracting me from it! Overall, I'm very pleased with the finished result, as it looks effective and achieved my objective of not taking too much time. It was also very cost effective and made great use of a single plastic kit. 

I think this shows the versatility of these ruined farmhouses from Warlord, as, with a little bit of cutting and ingenuity, I've ended up with a wide array of terrain to fight over that looks like it all fits together but is varied and visually interesting. Plus, the hard plastic is extremely robust and will stand up to having models placed all over it, something that some other materials struggle with. I've used this terrain in a few games prior to it being complete, and it works really well from a gameplay perspective. Now it will also look good whilst we're playing! 


Final Thoughts

This is a great terrain kit with a lot of versatility to it if you are willing to chop it up and experiment with different ways to put it together. The simple addition of a few pieces of balsa or lollipop stick helps transform the kit into an exciting setting for a skirmish game. Aesthetically, it looks great and the detail takes paint very well. These ruined farmhouses fit in perfectly in a variety of historical and fantasy settings and are well worth buying to accompany a number of mass battle or skirmish miniature games. 

You Might Like:

  • Design fits into multiple historical time periods and fantasy settings
  • Hard plastic is robust and easy to work with
  • Kit is highly modular and customisable
  • Sculpted detail is good, enabling quick painting with washes / drybrushing

You Might Not Like:

  • This is a model kit that requires assembly and painting, and a fair degree of modelling experience to get the most out of it - not recommended for novice modellers

Rating:

  • Aesthetic: 4/5
  • Difficulty: 4/5
  • Modularity: 5/5
  • Playability: 5/5
  • Quality: 5/5
Overall Score: 92%

Thursday, 25 November 2021

Never Look a Gift Dragon in the Mouth

We finally had a face-to-face game of D&D after almost a year of remote videocall sessions, and the players surprised me with an awesome dragon miniature (and a bottle of whisky, which went down very well! And everyone was surprised with an artist's depiction of the adventuring party too!). 

The dragon is a lovely kit from Zealot Miniatures and I knew I wanted to get it painted up straight away rather than have it sit on a shelf for months on end, and I figured it would be nice to keep the group updated with the progress.

I decided she was going to be a Green Dragon - I have plans to have the full bestiary of the primary Chromatic Dragons painted up at some point in the future (3 so far, including this one!), and there was something about this one that screamed GREEN to me. I later discovered that Zealot had painted her green as well on their web site, coincidentally. 


Components

All the components looked good, no obvious damage or flash or anything. Nicely casted model. Also had lots of good, long lugs built into it for assembly, so I figured it probably didn't need pinning. 

Assembly

Dry-fitting the components,  there were a few gaps that were going to need filling, but they were fairly minor. There weren't any instructions in the packet, but it was all self-explanatory. I liked the big column she was resting a foreclaw on and decided that an extra bit of masonry under a back foot might help with balance. 

I figured the best base to put her on would be a 130mm round base (same as the GW Mega-Gargants), as she fit on it really nicely. Those spread wings made me consider something larger, but it wasn't necessary (plus I was working on another Red Dragon on the same size base, so they would look good next to one another).


Filling 

The gaps were minor so just needed some liquid green stuff, no need for getting out the big guns on it. The largest gap was the right cheek, but was easily sorted. 


Basing

I canvassed opinions from the group on what to dress the base with. On previous dragons, I have tended towards a lair-type scene, with piles of treasure and captured weapons from those unwitting fools who have tried to steal that treasure. The overwhelming opinion was to put some dead bodies on this base, and I agreed that the damaged stone column here lent itself towards the dragon attacking some sort of temple or building or something, so perhaps a couple of dead defenders on the ground wouldn't go amiss... I also figured that I might be able to find something that looked vaguely like at least one of the adventurers, to show them meeting their doom at the hands of the dragon! 

Finding good dead bodies was a bit of an issue. I finally got one paladin-looking model, a metal one from Reaper. He was supposed to be filled full of arrows, but I figured I could fill the arrow holes with green stuff and he'd be dragon food instead. He was reminiscent of Guillerme too, so I made sure he had a glaive laid across his fallen body. The other victim was a dead dwarf that I found on Etsy, and I put him on some stairs that I already had to add a bit more height variation to the base. 

After that, I threw on some more interesting masonry bits (GW large basing details), some larger rocks, and finally a mix of grit and sand to get a nice varied texture (my standard basing technique nowadays). Overall, I was really happy with the level of detail - enough to make it really interesting, without taking away from the dragon herself.


Undercoat

I bought some Death Guard Green spray to see if that could help speed-paint my Orks, and figured this was a good opportunity to use it. I put it over a Chaos Black undercoat, keeping it fairly light so that there was a bit of shading created. 


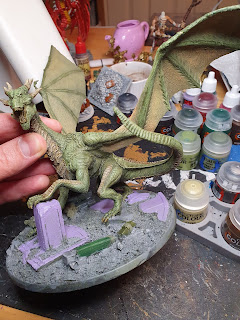
Initial painting

I decided to start off by using Militarum Green (Contrast paint) on the main scales, as a sort of heavy wash. I left it off the wing membranes and the thicker armour plates as I didn't want them becoming a deeper green - weirdly, this step made them look really strange in the photo as the Death Guard Green suddenly looked much paler next to the Militarum Green on top of the basecoat.

I then went with Aggaros Dunes (another Contrast) directly on top of the Death Guard over the thick bony plates - this worked really well to get an interesting brown colour with a hint of green still coming through.


Drybrushing

The great texture on this model made it an excellent candidate for drybrushing. I went for layers of Straken Green, Orruk Flesh and Ogryn Camo. These green layers went all over the Militarum Green, and also lightly onto the wings. I then decided to add some fleshy colours to the wing membranes, using an old (properly old and beautifully hexagonal!) pot of Bronzed Flesh, then a little Army Painter Fair Skin for a real gentle drybrush. That did come out a little heavier on one wing than I wanted, so I brought it back with a bit of green over the top. 

The bony scales and horns were drybrushed with Army Painter Otyugh Brown, making them a nice deep bony colour. 

Overall, I liked the subtlety of the colours and gentle transitions from scales to wings, it felt quite natural. 


Base and Final Details

Using my colour wheel, I could see that purple was directly opposite green, which was handy as I had already thought adding an element of purple to the base would be more interesting than doing all the stonework in grey! I used Army Painter Beholder Purple for that, then used Gryphhound Grey Contrast to dull it down significantly, before the wash that was going to be applied to the entire base (thinned down Army Painter Strong Tone). I was really pleased with that, it made the column and bits of broken masonry on the ground interesting without overpowering.

I ensured the claws and teeth were picked out in bone and painted the dead bodies up with simple colours that would, again, stand out from the grey but not be too distracting. I applied a liberal amount of Blood for the Blood God after the wash, including some around the dragon's mouth (she's a messy eater). I knew that the matt varnish was going to dull this glossy blood down, but I like the effect you get of doing that and then reapplying the blood paint over the top of the varnish - you end up with some dull, dried patches of blood as well as some glistening, fresh stuff. I also added a couple of patches of dark tufts to the outside of the base, maybe representing that she's crashed through a wall and there were some patches of vegetation just outside... mostly it just broke up the side of the base opposite the corpses. 

I made sure to put pupils in the glowing red eyes and, with that, she was finished and ready for varnishing with Munitorum Varnish! 


Complete!

The great wyrm complete! Overall, I think it was sitting down for seven modelling / painting sessions from start to finish, taking me just over four weeks (in between toddler watch and other things). So fairly quick compared to models I've done in the past. I was considering doing more to her - tinkering about with a little more drybrushing with even starker highlights here and there, maybe playing with a little extra shade in some of the deeper recesses. But, overall, I am really pleased with the overall effect and figured that the massive piles of grey plastic I have around the house would be more of a priority than tinkering any more on this dragon. Besides, I was concerned that I might overdo something and have to fix it, which would be a pain! 

I took some nice photos and called her done. I just need to sort out a transportation solution for her (the wings are too big to fit in a standard KR case, so will have to think of something else). I took some more photos to compare her with other dragons and wyverns I've painted in the past, so will post that soon. 

She just needs a name - perhaps Venomthrax, Scourge of the Verdant Plains?