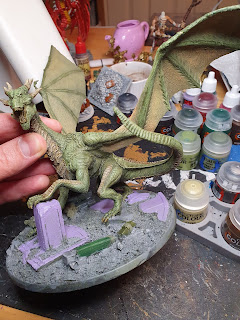
We finally had a face-to-face game of D&D after almost a year of remote videocall sessions, and the players surprised me with an awesome dragon miniature (and a bottle of whisky, which went down very well! And everyone was surprised with an artist's depiction of the adventuring party too!).
The dragon is a lovely kit from Zealot Miniatures and I knew I wanted to get it painted up straight away rather than have it sit on a shelf for months on end, and I figured it would be nice to keep the group updated with the progress.
I decided she was going to be a Green Dragon - I have plans to have the full bestiary of the primary Chromatic Dragons painted up at some point in the future (3 so far, including this one!), and there was something about this one that screamed GREEN to me. I later discovered that Zealot had painted her green as well on their web site, coincidentally.
Components
All the components looked good, no obvious damage or flash or anything. Nicely casted model. Also had lots of good, long lugs built into it for assembly, so I figured it probably didn't need pinning.
Assembly
Dry-fitting the components, there were a few gaps that were going to need filling, but they were fairly minor. There weren't any instructions in the packet, but it was all self-explanatory. I liked the big column she was resting a foreclaw on and decided that an extra bit of masonry under a back foot might help with balance.
I figured the best base to put her on would be a 130mm round base (same as the GW Mega-Gargants), as she fit on it really nicely. Those spread wings made me consider something larger, but it wasn't necessary (plus I was working on another Red Dragon on the same size base, so they would look good next to one another).
Filling
The gaps were minor so just needed some liquid green stuff, no need for getting out the big guns on it. The largest gap was the right cheek, but was easily sorted.
Basing
I canvassed opinions from the group on what to dress the base with. On previous dragons, I have tended towards a lair-type scene, with piles of treasure and captured weapons from those unwitting fools who have tried to steal that treasure. The overwhelming opinion was to put some dead bodies on this base, and I agreed that the damaged stone column here lent itself towards the dragon attacking some sort of temple or building or something, so perhaps a couple of dead defenders on the ground wouldn't go amiss... I also figured that I might be able to find something that looked vaguely like at least one of the adventurers, to show them meeting their doom at the hands of the dragon!
Finding good dead bodies was a bit of an issue. I finally got one paladin-looking model, a metal one from Reaper. He was supposed to be filled full of arrows, but I figured I could fill the arrow holes with green stuff and he'd be dragon food instead. He was reminiscent of Guillerme too, so I made sure he had a glaive laid across his fallen body. The other victim was a dead dwarf that I found on Etsy, and I put him on some stairs that I already had to add a bit more height variation to the base.
After that, I threw on some more interesting masonry bits (GW large basing details), some larger rocks, and finally a mix of grit and sand to get a nice varied texture (my standard basing technique nowadays). Overall, I was really happy with the level of detail - enough to make it really interesting, without taking away from the dragon herself.
Undercoat
I bought some Death Guard Green spray to see if that could help speed-paint my Orks, and figured this was a good opportunity to use it. I put it over a Chaos Black undercoat, keeping it fairly light so that there was a bit of shading created.
Initial painting
I decided to start off by using Militarum Green (Contrast paint) on the main scales, as a sort of heavy wash. I left it off the wing membranes and the thicker armour plates as I didn't want them becoming a deeper green - weirdly, this step made them look really strange in the photo as the Death Guard Green suddenly looked much paler next to the Militarum Green on top of the basecoat.
I then went with Aggaros Dunes (another Contrast) directly on top of the Death Guard over the thick bony plates - this worked really well to get an interesting brown colour with a hint of green still coming through.
Drybrushing
The great texture on this model made it an excellent candidate for drybrushing. I went for layers of Straken Green, Orruk Flesh and Ogryn Camo. These green layers went all over the Militarum Green, and also lightly onto the wings. I then decided to add some fleshy colours to the wing membranes, using an old (properly old and beautifully hexagonal!) pot of Bronzed Flesh, then a little Army Painter Fair Skin for a real gentle drybrush. That did come out a little heavier on one wing than I wanted, so I brought it back with a bit of green over the top.
The bony scales and horns were drybrushed with Army Painter Otyugh Brown, making them a nice deep bony colour.
Overall, I liked the subtlety of the colours and gentle transitions from scales to wings, it felt quite natural.
Base and Final Details
Using my colour wheel, I could see that purple was directly opposite green, which was handy as I had already thought adding an element of purple to the base would be more interesting than doing all the stonework in grey! I used Army Painter Beholder Purple for that, then used Gryphhound Grey Contrast to dull it down significantly, before the wash that was going to be applied to the entire base (thinned down Army Painter Strong Tone). I was really pleased with that, it made the column and bits of broken masonry on the ground interesting without overpowering.
I ensured the claws and teeth were picked out in bone and painted the dead bodies up with simple colours that would, again, stand out from the grey but not be too distracting. I applied a liberal amount of Blood for the Blood God after the wash, including some around the dragon's mouth (she's a messy eater). I knew that the matt varnish was going to dull this glossy blood down, but I like the effect you get of doing that and then reapplying the blood paint over the top of the varnish - you end up with some dull, dried patches of blood as well as some glistening, fresh stuff. I also added a couple of patches of dark tufts to the outside of the base, maybe representing that she's crashed through a wall and there were some patches of vegetation just outside... mostly it just broke up the side of the base opposite the corpses.
I made sure to put pupils in the glowing red eyes and, with that, she was finished and ready for varnishing with Munitorum Varnish!
Complete!
The great wyrm complete! Overall, I think it was sitting down for seven modelling / painting sessions from start to finish, taking me just over four weeks (in between toddler watch and other things). So fairly quick compared to models I've done in the past. I was considering doing more to her - tinkering about with a little more drybrushing with even starker highlights here and there, maybe playing with a little extra shade in some of the deeper recesses. But, overall, I am really pleased with the overall effect and figured that the massive piles of grey plastic I have around the house would be more of a priority than tinkering any more on this dragon. Besides, I was concerned that I might overdo something and have to fix it, which would be a pain!
I took some nice photos and called her done. I just need to sort out a transportation solution for her (the wings are too big to fit in a standard KR case, so will have to think of something else). I took some more photos to compare her with other dragons and wyverns I've painted in the past, so will post that soon.
She just needs a name - perhaps Venomthrax, Scourge of the Verdant Plains?


No comments:
Post a Comment