
Road to Apocalypse: 8. Goff Aggression
12 February 2022

Brother Lytharus groaned in pain as he looked towards the horizon. Belching black smoke told him that the Orks were in pursuit. The rest of his Deathwatch Kill Team had been eliminated by the foul Greenskins, and now it was down to him to try and relay what he had found out to his superiors in the Ordo Xenos. Unfortunately, something about the strange technology the Orks were using was causing trouble with his long-range vox transmitter, so he had been unable to send the data packet off-world. He just hoped that his distress beacon could still be located - not for his own benefit, but to accomplish his mission. He had seen the gathering Ork forces, and this was no ordinary invasion. More than one of their degenerate 'Klans' were present on the planet, a sure sign that a particularly dangerous Warboss was leading the Orks - it was the only way that the animosity between them could be kept in check. Yes, this was the beginnings of a true WAAAAGH!, and there could be dire consequences for this whole sub-sector if it wasn't dealt with quickly enough.
The Deathwatch Marine coughed up blood into his helmet. He could go no further. As he slipped in and out of consciousness, he said a prayer to the Emperor to ask for forgiveness for failing in his mission. Greenskins were coming to finish the job, and he had not the strength to resist... but, what was that? The unmistakable trails of drop pods in the sky. Could it be? Yes, the blessed Emperor had answered his prayers - his brother Astartes had located him! Lytharus tried to stand but could not. He would have to wait right here and hope that his rescuers got to him before the Orks did...
Mission Generator
We decided to use the Mission Generator tables for this game, as we had played quite a few of the 'standard' Apocalypse missions so far in our little campaign. I was really looking forward to seeing how this would change the game, and it was really cool - I'll use them again!
Deployment: 2. Dawn of War. Simple long table deployment, we didn't roll for this as it was where we were sitting anyway.
Objective: 4. The Prize. We had to grab something from the middle of the table. We used a Deathwatch Marine - clearly he had been infiltrating to ascertain the Ork strength, and the rest of the Kill Team had been eliminated. The Orks would want to capture him while the Space Marines were trying to rescue him and, perhaps more importantly, the intel he had gathered. The side that was holding onto him at the end of the battle would gain 5 VP and win the game. The only other way to win would be by destroying the enemy army completely.
Twist: 8. Battle Frenzy. Any time an entire Detachment was destroyed, we could draw an extra Command Asset card.
Ruse: 6. Tactical Reserves. Mark's Imperial forces were a little lower PL than my Orks, so he had this Ruse to be able to use. It would allow him to bring back any destroyed unit as a reinforcement, once per battle.
The difference in force size was minimal, so Mark had a Ruse but no Sudden Death advantage to use (one force has to be half the size of the other to get a roll on the Sudden Death table).
Deployment
I was using exactly the same 150 PL force that I would be using at the finale tomorrow in Midhurst - I didn't want to mess about preparing a different list! Mark had to add a couple of bits to his list, as the Imperials had four players for tomorrow so their individual armies all had to be a little smaller.
This was going to be a good little test of my list (which I was pretty proud of), and a good final practice to make sure we were familiar with the rules ahead of tomorrow's game.


Turn 1
The Knight Armigers stalked forwards, firing their guns at the Stompa. These doughty Knights had fought Titans much bigger than this foul green monstrosity, so advanced towards it with no hesitation. They were somewhat surprised when half their shots were deflected by a crackling energy field... this class of Ork war engine rarely had any form of Void Shielding. Perhaps a little more caution was in order...
Opposite, the Morkanaut and Deff Dredds stomped round the large industrial platform. They were far less graceful than the Imperial Knights, but still bristling with weaponry. They failed to fit anything with their shooting, however, probably far too excited about charging in to close combat.
To the Ork left flank, the Space Wolves rushed forwards, shooting their bolters at the Mek Gunz and making the Grots duck behind their weapons. After a good shouting-to, the Grots crept out from their hiding places and fired their strange weaponry across No Man's Land, fizzling energy weapons cracking and scorching whatever they hit.
The Crimson Fists stayed back, providing a solid firebase to support their fellows. But, luckily for the Stompa, the Armigers had boldly strode forward to the centre of the battlefield, just where that black-armoured Beakie had collapsed. They were close enough for the Stompa to charge them, and that's just what it did. The great green machine smashed into the lead Armiger, chopping it cleanly in half with its chainblade. The Stompa Kaptin laughed in delight and ordered all weapons to fire on full auto. He must have been far too excited about killing the little knight, as none of the many, many shots that he fired found a target. The Hellblasters on top of the bunker were particularly fortunate to avoid getting hit by the storm of shells from the big shootas and Supa-Gatler, which cut so many holes through the bunker beneath their feet that it seemed the whole building would collapse under them.
Behind the Stompa, the Grots and Slugga Boyz moved round to head towards the centre of the battlefield, using the huge machine as cover from the Space Marine shooting. Soon, they would choke the area around the injured Deathwatch Marine with so many bodies that the Beakie rescue force would never be able to get the git back to their lines.
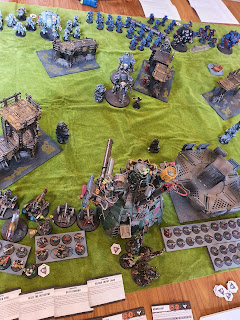


At the end of the turn, the Orks had lost 2 Deff Dredds and one Mek Gun while the Imperial forces had lost one Armiger and a unit of Aggressors. But, that didn't really matter - no one had yet claimed their Prize (whether to capture or rescue him), and that was all that would count in this mission. The fighting in the centre was likely to intensify further as each side tried to achieve that objective.
End of Turn 1
Imperium:
Doesn't have the Prize +0 VP
Total: 0 VP
Orks:
Don't have the Prize +0 VPTotal: 0 VP
Turn 2
A Command Asset card allowed me to bring back my destroyed Deff Dredd, Gitslasha. He charged in from the board edge near the Crimson Fists line and made straight for the Redemptor Dreadnought. Sure, he was probably going to get swatted by the Space Marine walker and it's Terminator buddies, but it was a good distraction to prevent them from helping their mates in the middle of the table, leaving it clear for the Orks to grab the prisoner and make their escape.
In the centre, Ghazghkull, Gulskrag and the Meganobz all leapt out of the Stompa. Gulskrag immediately jumped onto the prone Deathwatch Marine and scooped him up, slinging the Prize over his shoulder. The Warboss would have loved to get involved in the fighting, but Ghazghkull had made it clear that he needed to take this Beakie back to the camp to make a proper example out of him. He started walking back through the swarm of Grots that quickly jumped out of the way as he came near.
Ghazghkull and the Meganobz got stuck in, destroying the second Armiger with little difficulty. The Stompa, empty of its cargo, continued shooting everything it had at the Space Marines - yet again, the Hellblasters emerged from the fusillade unscathed! Had the Meks even remembered to load the Supa-Gatler?!
With the Crimson Fists Dreadnoughts and heavy infantry distracted by the arrival of a Deff Dredd in their midst, it was down to the Space Wolves to try and do something about the rescue mission. The Hellblasters did their best to take down the massive Stompa, while the Redemptor charged in to try and tackle Ghazghkull. Unlike most of the Dreadnought's opponents, the Ork Warboss was not dwarfed by the venerable walker.
As it was, the Space Marines did not have time to wade through the wall of armoured Orks in front of them. Gulskrag was beetling his way back through the lines; they had failed in their rescue mission. At this point, it was clear that the Adeptus Astartes should limit their losses and retreat. They would have to regroup and determine a new course of action to end this Ork threat once and for all.


The Orks had succeeded in the single objective for this mission, securing the Prize and gaining 5 VP for the privilege. This battle had not been quite as devastating as some of the others (there were plenty of units left on the table), but the Space Marines couldn't afford to lose more bodies in a fruitless attempt to recover one member of a lost Kill Team. Whatever intel he had would be lost with him, but the size of Ork force that the Space Marines had encountered surely told them that something needed to be done about the increased Greenskin activity on this planet. We'll see how that goes tomorrow...!
End of Turn 2
Imperium:
Doesn't have the Prize +0 VP
Total: 0 VP
Orks:
Have secured the Prize +5 VPTotal: 5 VP
Aftermath
Mark and I had a bit of difficulty getting through this game, bit slow to get going and then distracted sorting out a few bits for other people at the club. We had reduced the PL limit right down in the hope of getting more than 3 turns done, but only managed 2... it was good fun though, and I really liked the Mission Generator tables. There was just one objective for this mission (unless one player could totally destroy their opponent), so it was really focussed and casualties were less important. I think it would have been really interesting to play another turn or two to see what would have happened - could the Marines have recovered the MacGuffin? I think they would have struggled, as Gulskrag was running off back towards his own lines, surrounding by a tonne of Boyz and a Stompa. But who knows? He wasn't quite safe at the end of Turn 2.
I think I would probably want to sit down with the mission tables in the future and design a bit more of a narrative Apocalypse game. Not to make it more complicated, just to put together some clear objectives to complete that aren't just 'kill' or 'sit on these locations'. This mission was a good example of something that was a little bit different, and I liked that.
Great fun and I think we're ready for the final battle at Midhurst tomorrow!
No comments:
Post a Comment